For many Mac owners, Deeper is old news. It’s been around for a while, and it’s very well-known for how many hidden settings it can provide easy access to. Deeper allows Mac users to access settings that have been hidden from the general user by Apple. These settings can range anywhere from dock appearance to animated desktop backgrounds. For those new to the Mac scene, those who just didn’t realize before how much more they could tweak, or those who simply hadn’t heard of Deeper until now, enjoy.
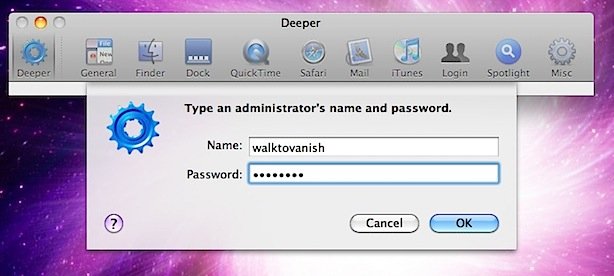
First, download Deeper here and install it. Deeper requires 10.6+, so it’s a no-go for those on Leopard or Tiger. When you open Deeper, you will need to type in your administrator password in order to use it. When first opened, Deeper will pop up a disclaimer reminding you that should anything go awry, it’s your own fault. This pesky box can be easily done away with in Preferences so that it doesn’t continue to pop up every time Deeper is opened. Deeper is categorized into 10 different sections. Below is a brief description about what can be found in each of them.
General- As the name implies, the general column contains very general settings that didn’t belong to any other particular section. The most notable settings here include changing your screen capture format and animating your desktop background. As a word of warning, don’t animate your desktop background unless: a. you have a good processor with plenty of RAM and b. you don’t rely on a battery. If you’re on a MacBook of any kind, an animated background will deplete your battery very quickly.
Finder- The Finder column features all hidden settings regarding the Finder application. Here you can change the menu bar background, whether or not your iDrive appears under Devices, whether or not Finder displays the current filepath, and more.
Dock- In the Dock column, you can find all sorts of settings for your dock. These settings can range from changing your dock’s appearance to changing how windows scale down when minimized. Here you can also set the dock to hide unless you mouse over it’s location. You can also toggle dock autohiding with the Command + Option + D shortcut.
Quicktime- This rather small section deals with the Quicktime application. Here you can change when the Quicktime controls are visible, whether or not movies autoplay, and more. A small section, but still worth looking at.
Safari- The Safari section deals with Safari, obviously. The settings available here range from automatically opening pdfs in Safari to how many days Safari’s browsing history will store.
Mail- As I’m sure you’ve already guessed, the Mail section deals with the Mail application. Settings here are rather minimal, ranging from font size to whether or not attachments are displayed.
iTunes- Here you can disable Ping and the iTunes Store, disable the miniplayer, and more. There aren’t too many features here, but they’re worth trying.
Login- This is a section where being careful is a necessity. In addition to disabling menu options like Restart, Sleep, etc., you can also change the startup mode. Again, this section must be approached with caution.
Spotlight- While there are only 4(yes, 4) settings available dealing with the Spotlight, they are very helpful. From this menu the Spotlight icon can be hidden, and search results that involve the dictionary or calculator can be toggled here.
Misc.- Last, but not least, are the Misc. options. The options here deal with a myriad of things, which is why they do not fit in any of the previous sections. You can disable/enable dmg verification and show debug menus, to name a few things.
And there you have it, a small list of some things you can do using Deeper. If you’ve got a feature you really like, let us know in the comments below!