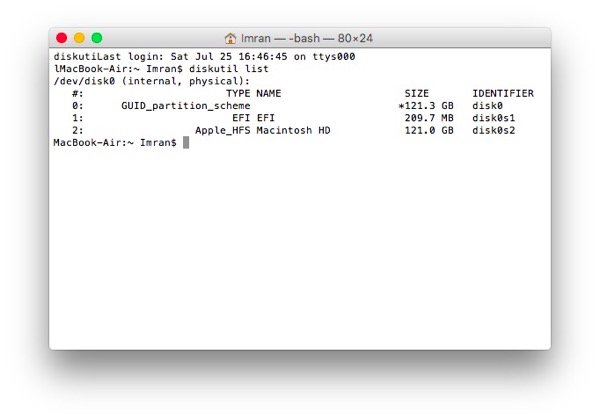
Mac OS X has a pretty solid disk utility for scenarios where you might want to create, resize or delete or modify new or existing partitions. However, in rare cases, the utility might not be as helpful as it should be and can leave your Mac’s SSD or hard drive in a mess.

Such an experience happened recently with yours turly. I had installed Windows 10 Insider Preview via Boot Camp on my MacBook Air but it stopped working due to an incomplete Windows Update. I decided to remove the installation from my Mac but the Boot Camp utility in OS X used to get stuck after a while when recovering the partition to the original size. Meanwhile, Disk Utility showed the space as reserved for Boot Camp but did not show or allow me to mount the drive so I could delete it and merge it with my OS X partition.
So, here I was, left with half of my disk space on my MacBook Air (I have the 128GB variant). From prior Windows experience, this reminded me to take the command line route, or Terminal, in case of Mac. A little research through Apple’s support documentation for the right OS X Terminal commands led me to the below solution.
How to delete a partition through macOS Terminal
In case you ever get stuck in a situation where you are unable to recover a partition on your Mac, follow the below steps:
- Open up Terminal on your Mac
- Type in the below command and press enter
diskutil list
- It should show you a list similar to the above screenshot. From here, you would have to select the partition you want to recover and erase it. Use the following command:
diskutil eraseVolume JHFS+ drive /dev/disk0s4
Here, instead of disk0s4, use the correct volume identifier as per the table you saw when you entered the list command. JHFS+ is short for Journaled Heirarchical File System Extended, or in a nutshell, the file system used by OS X. The volume being erased has to match the first volume’s file format else there would be unexpected data loss.
- Once the volume is erased, you now have to merge the partitions. For this step, note that the first volume that you list in the command will gain the space from the second volume, effectively destroying any data in it. The first volume, in this case likely to be the OS X installation volume, will remain safe.
diskutil mergePartitions JHFS+ NewName disk2s4 disk2s6
Here, the command is to merge partitions, in the JHFS+ format, with a name (NewName as an example) and the volume identifiers, first and second volumes, respectively.
- Let this command work and do its thing. After it’s done, you can re-run the diskutil list command again to verify that the volumes have merged and you have regained your space. You can also go to About This Mac > Storage or Disk Utility to double check.
Similarly, these commands can also be used to create, mount, unmount, rename partitions and do much more on your Mac. Type in diskutil in the Terminal and hit enter to see the complete list of supported commands.
If you require any help in the above steps, feel free to reach out to me via comments below or on Twitter.
Life saver! Thanks a million m8
Hey man :)
Can you please tell me which identifiers I need to type from my list here into the “diskutil mergePartitions JHFS+ NewName disk2s4 disk2s6” step above? I had a go but I’m just getting confused…
The 40GB partition is the one I’m trying to get rid of.
Cheers
It’s disk0s4. Which partition do do you want to merge it with? If it’s Apple_CoreStorage (709.3GB), the first disk name should be disk0s2.
Thanks :)
disk0s2 is the one I want to merge it to, so I did all that, but then it said that it couldn’t merge and asked me if I wanted to reformat instead, I said yes, but it then said that it encountered an error… The screenshot shows it. Any idea what I should do now…?
Can you try formatting both partitions and merging again?
Okay. How would I go about doing that? (I really have no idea what I’m doing…)
Try using Disk Utility and formatting the partitions that you want to merge. Make sure to back up any important data from these partitions before formatting. After that, try this guide again.
Thanks mate :) All good now! Saved me some money there I’m sure.
http://uploads.disquscdn.com/images/5ce009470a23fdaaaea887495b0cf750cdc53a4864a7e10ea595ad72a8f350ab.png
Hi all! :)
I tried this on my girlfriends computer but it didn’t show the partition (it should be around 32-33 GB). What can I do?
Best wishes
Robin
I find it really peculiar that Apple calls the process of erasing, then creating a volume – erasing a volume when the truth is, they do not offer any way of actually deleting a partition without also creating one in the wake of that delete process.
Diskutil is UTTERLY useless, it’s insane that after 20 years of OS X / MacOS, it’s so complicated to just rid a disk of all its partition like one initializes a disk on Winblows with a simple command!!!
Is there no equivalent of the “diskpart clean” command on MacOS???
Or will I have to put this SSD in a PC to finally remove that stupid APFS volume nesting that doesn’t want to get erased from within the system (obviously I’m trying that from another volume)
OMG!!! I had a 4GB partition on a 1TB drive that I could not get rid of using disk utility…. You saved me the mild irritation of seeing two volumes every time I plugged it in, AND more importantly, 4GB….. you truly are one of Gods angels set to help mankind. Bless you sir.